Multiplatform Plugins in Unreal Engine 4
Long time ago I wrote an article about adding a multiplatform runtime module to the Unreal Engine 4. This day that article would be complately out of date. UE4 changed and the way the new stuff can be added to it changed too. First of all, I want to be clear – this article will not cover 100% of the topic, because it’s simply too broad. This is rather a quick start into writing your own plugins, getting know the basics. This article will cover the following topics:
For the lazy ones – here’s the github source code version.
So, with all of this in mind – let’s start!

Then, select “Blank Plugin”, name it somehow (for this article I’ve named our plugin “XPlugin”) and press “Create Plugin”.

Right after the Editor finished its job you will see that the Plugin has already been added and enabled for this project (it will be somewhere on the bottom of the list).

You will also notice that the source of the plugin has been added to the Visual Studio solution.
Here is a little trick the Unreal Engine 4 does – if you put files inside the directories named the same as a platform name – it will compile only files from the directory with the name of the platform we currently build for. The directory structure should looks like this:

For the XPluginImplBase, which is the base implementation of what plugin does, we have a following code:
XPluginImplBase.h
XPluginImpl.h
XPlugin.h
XPlugin.Build.cs
To call a method from the plugin you simply need to get the singleton object of the plugin implementation class and run the function implemented there. I quickly added the BeginPlay() override in my project’s Game Mode and run the method from the plugin at start of the game:

The directory tree should look like this:

The header file contains a list of the static BlueprintCallable or BlueprintPure UFunctions. The source file – their implementations:
XPluginBPLibrary.h

Let’s create a XPluginComponent class. Once again – header file inside Classes directory, source file inside Private directory.
XPluginComponent.h
XPluginComponent.cpp

With XPlugin Component added to the Actor – you can implement the On received XPlugin Test Message Event!


This class is simply an UObject that is serializable to the config. Let’s add some configurable parameters:
XPluginSettings.h
Then, modify the XPlugin.cpp. Add to the StartupModule and ShutdownModule the following code:
Notice, that settings are greyed out, because we added EditCondition field to the UProperties meta.

To get any value from these settings you can use either classic get config way:
To create a Blueprint block that will run asynchronously the UBlueprintAsyncActionBase class must be created. I’ve added it to the XPluginBPLibrary file, but you can make a separate translation unit for it.
But first – let’s add the Http module to the Private Dependency Modules in the plugin Build.cs

Now – go and make some!
- Creating a plugin
- Building a plugin
- Making a plugin that works differently, depending on the platform
- Using the plugin from C++
- Using the plugin from Blueprints
- Creating a plugin settings editable from the Editor
- Calling asynchronous functions from Blueprints
For the lazy ones – here’s the github source code version.
So, with all of this in mind – let’s start!
Creating a plugin
The easiest way to create a plugin for UE4 is to open any C++ UE4 project in the Editor, press Edit->Plugins and then press “New Plugin” button in the Plugins window (it will be at the right-bottom corner of the window).
Then, select “Blank Plugin”, name it somehow (for this article I’ve named our plugin “XPlugin”) and press “Create Plugin”.
Right after the Editor finished its job you will see that the Plugin has already been added and enabled for this project (it will be somewhere on the bottom of the list).

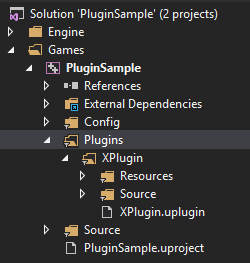
You will also notice that the source of the plugin has been added to the Visual Studio solution.
Building a plugin
If you build a solution the plugin will not build by itself. To trigger it’s building add to your project’s Build.cs the following line:PublicDependencyModuleNames.Add( "XPlugin" );Making a plugin that works differently, depending on the platform
There are probably many ways to achieve this, but I always create a base class which handles the default implementations of methods (in case if the plugin is used on the unsupported platform) and classes that inherits from it for every platform I want to support. Then when starting up the plugin I simply create an object of the proper class, dependently of the platform.Here is a little trick the Unreal Engine 4 does – if you put files inside the directories named the same as a platform name – it will compile only files from the directory with the name of the platform we currently build for. The directory structure should looks like this:
For the XPluginImplBase, which is the base implementation of what plugin does, we have a following code:
XPluginImplBase.h
#pragma once

#include "CoreMinimal.h"

class XPLUGIN_API FXPluginImplBase
{
public:
    virtual ~FXPluginImplBase() {}
    virtual void TestXPlugin();
};#include "XPluginImplBase.h"
#include "Engine/Engine.h"
void FXPluginImplBase::TestXPlugin()
{
GEngine->AddOnScreenDebugMessage(-1, 2.f, FColor::Red, TEXT("TestXPlugin launched from Generic Platform"));
}XPluginImpl.h
#pragma once

#include "XPluginImplBase.h"

class XPLUGIN_API FXPluginImpl : public FXPluginImplBase
{
public:
    ~FXPluginImpl() override {}
    void TestXPlugin() override;
};#include "XPluginImpl.h"
#include "Engine/Engine.h"
void FXPluginImpl::TestXPlugin()
{
GEngine->AddOnScreenDebugMessage(-1, 2.f, FColor::Red, TEXT("TestXPlugin launched from Windows Platform"));
}XPlugin.h
#pragma once

// These are basic includes needed by the module
#include "CoreMinimal.h"
#include "ModuleManager.h"

// Include the ImplBase so it will be easily accessible from the game - simply include this one header where you need it.
#include "XPluginImplBase.h"

// It is a good practice to declare a Log category for every plugin
DECLARE_LOG_CATEGORY_EXTERN(XPluginLog, Log, All);

// Implementation of the Plugin (must inherit from IModuleInterface)
class XPLUGIN_API FXPluginModule : public IModuleInterface
{
public:

    // IModuleInterface implementation
    // These are implementations of methods which runs when the module (plugin) starts up and shuts down
    virtual void StartupModule() override;
    virtual void ShutdownModule() override;

    // This is a handy method for getting instance of the plugin implementation object from any place in code.
    static TSharedPtr<FXPluginImplBase> Get();

private:

    // Pointer to the only instance of the plugin
    static FXPluginModule* Singleton;

    // Pointer to the platform specific implementation of the plugin
    static TSharedPtr<FXPluginImplBase> ModuleImplPtr;
};// Obligatory includes to make it all work
#include "XPlugin.h"
#include "XPluginImpl.h"
// Generated localization namespace that can be used in the future for plugin localzation
#define LOCTEXT_NAMESPACE "FXPluginModule"
// Defining the Log category (declaration was in the header)
DEFINE_LOG_CATEGORY(XPluginLog);
// Define singletones of the plugin and plugin implementation so the linker will be satisfied
FXPluginModule* FXPluginModule::Singleton = nullptr;
TSharedPtr<FXPluginImplBase> FXPluginModule::ModuleImplPtr = nullptr;
// This method is launched after creating the instance of the plugin:
void FXPluginModule::StartupModule()
{
// Remember the address to this instance of the plugin
Singleton = this;
// If the plugin is compiled against supported platform - create the implementation of this plugin.
// If the plugin is compiled against not supported platform - create the empty base implementation of this plugin, so it will compile with success.
#if (PLATFORM_IOS || PLATFORM_ANDROID || PLATFORM_WINDOWS)
ModuleImplPtr = MakeShareable(new FXPluginImpl());
#else
ModuleImplPtr = MakeShareable(new FXPluginImplBase());
#endif
}
// This method is launched when this instance of plugin is shutting down.
void FXPluginModule::ShutdownModule()
{
// Null point both singletons. The plugin singleton will be soon deleted by the Engine.
// The implementation singleton is a shared pointer, so it will be deleted when it's safe.
Singleton = nullptr;
ModuleImplPtr = nullptr;
}
// This method will give you the instance of the plugin implementation.
TSharedPtr<FXPluginImplBase> FXPluginModule::Get()
{
// First of all - check if the module has been loaded and load it if hasn't.
// On the IOS and Android the plugin is loaded at the game startup. On the Windows Editor it is not,
// so it will be created when used first.
if (Singleton == nullptr)
{
check(IsInGameThread());
FModuleManager::LoadModuleChecked<FXPluginModule>("XPlugin");
}
// Sanity check if everything was properly created
check(Singleton != nullptr);
check(Singleton->ModuleImplPtr.IsValid() == true);
// Return the pointer to the module implementation.
return Singleton->ModuleImplPtr;
}
// We can end the localization namespace here
#undef LOCTEXT_NAMESPACE
// Say the engine that this file describes the implementation of the module
IMPLEMENT_MODULE(FXPluginModule, XPlugin)XPlugin.Build.cs
using UnrealBuildTool;

public class XPlugin : ModuleRules
{
    public XPlugin(ReadOnlyTargetRules Target) : base(Target)
    {
        // This parameter enables the Include-What-You-Use principle in the Engine for this plugin.
        PCHUsage = ModuleRules.PCHUsageMode.UseExplicitOrSharedPCHs;

        // Add basic public and private include paths so the plugin and thr game will be able to locate include files.
        PublicIncludePaths.Add("XPlugin/Public");
        PrivateIncludePaths.Add("XPlugin/Private");

        // Add basic dependency modules. You can add some more modules here if you need them.
        PublicDependencyModuleNames.AddRange(new string[]{ "Core" });
        PrivateDependencyModuleNames.AddRange(new string[]{ "CoreUObject", "Engine" });

        // For every supported platform add the proper directory to private include paths so the plugin will know where to look for platform specific includes.
        // Also it is a good practice to add a Definition that tells us if the plugin is implemented or not, so we can enable or disable parts of code in the game which dependent on the plugin implementation.
        if (Target.Platform == UnrealTargetPlatform.IOS)
        {
            PrivateIncludePaths.Add("XPlugin/Private/IOS");
            Definitions.Add("WITH_XPLUGIN=1");
        }
        else if (Target.Platform == UnrealTargetPlatform.Android)
        {
            PrivateIncludePaths.Add("XPlugin/Private/Android");
            Definitions.Add("WITH_XPLUGIN=1");
        }
        else if (Target.Platform == UnrealTargetPlatform.Win64)
        {
            PrivateIncludePaths.Add("XPlugin/Private/Windows");
            Definitions.Add("WITH_XPLUGIN=1");
        }
        else
        {
            Definitions.Add("WITH_XPLUGIN=0");
        }
    }
}
Using the plugin from C++
The plugin is ready to use! Let’s try it.To call a method from the plugin you simply need to get the singleton object of the plugin implementation class and run the function implemented there. I quickly added the BeginPlay() override in my project’s Game Mode and run the method from the plugin at start of the game:
#include "PluginSampleGameModeBase.h"
#include "XPlugin.h"

void APluginSampleGameModeBase::BeginPlay()
{
    Super::BeginPlay();
    FXPluginModule::Get()->TestXPlugin();
}Using the plugin from Blueprints
What if we want to run this function from Blueprints? We have to create a new class which implements the Blueprint Function Library class. Let’s call this class a XPluginBPLibrary. Add the header file to the Classes directory and the source file to the Private directory. Instead of the Classes directory you can use the Public one, but I like to keep all of the UObject related headers in this directory.The directory tree should look like this:
The header file contains a list of the static BlueprintCallable or BlueprintPure UFunctions. The source file – their implementations:
XPluginBPLibrary.h
#pragma once

#include "Kismet/BlueprintFunctionLibrary.h"
#include "XPluginBPLibrary.generated.h"

UCLASS()
class XPLUGIN_API UXPluginBPLibrary : public UBlueprintFunctionLibrary
{
    GENERATED_BODY()
public:
    UFUNCTION(BlueprintCallable, Category = "XPlugin", DisplayName = "TestXPlugin")
    static void TestXPlugin_BP();
};#include "XPluginBPLibrary.h"
#include "XPlugin.h"
void UXPluginBPLibrary::TestXPlugin_BP()
{
FXPluginModule::Get()->TestXPlugin();
}Delegates and Events
The another way the plugin can comunicate with the Blueprints or with the Game is by delegates. The best known to me approach is to create an ActorComponent that can receives events and which can be added to any Actor. The events are triggered by the Multicast Delegates from code.Let’s create a XPluginComponent class. Once again – header file inside Classes directory, source file inside Private directory.
XPluginComponent.h
#pragma once

#include "Runtime/Engine/Classes/Components/ActorComponent.h"
#include "XPluginComponent.generated.h"

// We create an Actor Component that can be spawned inside Blueprints
UCLASS(meta = (BlueprintSpawnableComponent), DisplayName = "XPlugin")
class XPLUGIN_API UXPluginComponent : public UActorComponent
{
    GENERATED_BODY()

public:

    // These are begin and end methods from UActorComponent. We must override them.
    void OnRegister() override;
    void OnUnregister() override;

    // This is declaration of "Static Multicast Delegate".
    // Plugin can broadcast it to any other parts of the code that has been binded to it.
    DECLARE_MULTICAST_DELEGATE_OneParam(FXPlugin_OnReceivedTestMessageDelegate, const FString&);
    static FXPlugin_OnReceivedTestMessageDelegate OnReceivedTestMessageDelegate;

    // This is declaration of "Dynamic Multicast Delegate".
    // This is the delegate that will be invoking the Blueprint Event.
    DECLARE_DYNAMIC_MULTICAST_DELEGATE_OneParam(FXPlugin_OnReceivedTestMessageDynamicDelegate, const FString&, Message);
    UPROPERTY(BlueprintAssignable, meta = (DisplayName = "On received XPlugin Test Message"))
    FXPlugin_OnReceivedTestMessageDynamicDelegate OnReceivedTestMessageDynamicDelegate;

private:

    // This is a helper method for launching the Dynamic Multicast Delegate when the Static Multicast Delegate has been invoked.
    void OnReceivedTestMessageDelegate_Handler(const FString& Message);
};
XPluginComponent.cpp
#include "XPluginComponent.h"

// Definition of static the delegate variable so the linker will be satisfied.
UXPluginComponent::FXPlugin_OnReceivedTestMessageDelegate UXPluginComponent::OnReceivedTestMessageDelegate;

// Register component. Add the Handler method to the Static Multicast Delegate so when it will be invoked the
// Event in Blueprint will be invoked too.
void UXPluginComponent::OnRegister()
{
    Super::OnRegister();
    OnReceivedTestMessageDelegate.AddUObject(this, &UXPluginComponent::OnReceivedTestMessageDelegate_Handler);
}

// Unregister component. Simply cleanup any binding of the Static Multicast Delegate.
void UXPluginComponent::OnUnregister()
{
    OnReceivedTestMessageDelegate.RemoveAll(this);
    Super::OnUnregister();
}

// When the Static Multicast Delegate has been invoked - broadcast the Dynamic Multicast Delegate to Blueprint.
// Make sure the call is made from the Game Thread.
void UXPluginComponent::OnReceivedTestMessageDelegate_Handler(const FString& Message)
{
    FFunctionGraphTask::CreateAndDispatchWhenReady([=]()
    {
        OnReceivedTestMessageDynamicDelegate.Broadcast(Message);
    }, TStatId(), NULL, ENamedThreads::GameThread);
}UXPluginComponent::OnReceivedTestMessageDelegate.AddUObject(this, &APluginSampleGameModeBase::ReceivedTestMessageFunction);UXPluginComponent::OnReceivedTestMessageDelegate.Broadcast(TEXT("Some Test Msg from Delegate!"));With XPlugin Component added to the Actor – you can implement the On received XPlugin Test Message Event!
Creating a plugin settings editable from the Editor
To create a settings for the plugin that are visible in the Editor the XPluginSettings class must be created. You know the drill. The header file to the Classes directory, the source file to the Private directory.This class is simply an UObject that is serializable to the config. Let’s add some configurable parameters:
XPluginSettings.h
#pragma once

#include "XPluginSettings.generated.h"

UCLASS(config = Engine, defaultconfig)
class XPLUGIN_API UXPluginSettings : public UObject
{
    GENERATED_BODY()

public:
    UXPluginSettings(const FObjectInitializer& ObjectInitializer);

    UPROPERTY(Config, EditAnywhere, Category = "Basic", meta = (DisplayName = "Enable XPlugin"))
    bool bEnableXPlugin;

    UPROPERTY(Config, EditAnywhere, Category = "Complex", meta = (EditCondition = bEnableXPlugin, DisplayName = "XPlugin Some String Setting"))
    FString StringSetting;

    UPROPERTY(Config, EditAnywhere, Category = "Complex", meta = (EditCondition = bEnableXPlugin, DisplayName = "XPlugin Some int Setting"))
    int32 IntSetting;
};#include "XPluginSettings.h"
// Just default values
UXPluginSettings::UXPluginSettings(const FObjectInitializer& ObjectInitializer)
: Super(ObjectInitializer)
, bEnableXPlugin(false)
, StringSetting("")
, IntSetting(0)
{
}[/Script/XPlugin.XPluginSettings]
bEnableXPlugin=False
StringSetting=
IntSetting=0PrivateIncludePathModuleNames.Add("Settings");Then, modify the XPlugin.cpp. Add to the StartupModule and ShutdownModule the following code:
// Don't forget these includes!
#include "ISettingsModule.h"
#include "XPluginSettings.h"

void FXPluginModule::StartupModule()
{
#if WITH_EDITOR
    // Register settings
    if (ISettingsModule* SettingsModule = FModuleManager::GetModulePtr<ISettingsModule>("Settings"))
    {
        SettingsModule->RegisterSettings("Project", "Plugins", "XPlugin",
            LOCTEXT("RuntimeSettingsName", "XPlugin"),
            LOCTEXT("RuntimeSettingsDescription", "Configure the XPlugin plugin"),
            GetMutableDefault<UXPluginSettings>()
        );
    }
#endif // WITH_EDITOR

...
}

void FXPluginModule::ShutdownModule()
{
#if WITH_EDITOR
    // Unregister settings
    if (ISettingsModule* SettingsModule = FModuleManager::GetModulePtr<ISettingsModule>("Settings"))
    {
        SettingsModule->UnregisterSettings("Project", "Plugins", "XPlugin");
    }
#endif // WITH_EDITOR

...
}Notice, that settings are greyed out, because we added EditCondition field to the UProperties meta.
To get any value from these settings you can use either classic get config way:
FString StringSetting = TEXT("");
GConfig->GetString(TEXT("/Script/XPlugin.XPluginSettings"), TEXT("StringSetting"), StringSetting, GEngineIni);#include "XPluginSettings.h"
const UXPluginSettings* XPluginSettings = GetDefault<UXPluginSettings>();
if (XPluginSettings)
{
FString StringSetting = XPluginSettings->StringSetting;
}Calling asynchronous functions from Blueprints
First of all – we need some asynchronous functionality to call. Lets make a function that will run the HTTP request!To create a Blueprint block that will run asynchronously the UBlueprintAsyncActionBase class must be created. I’ve added it to the XPluginBPLibrary file, but you can make a separate translation unit for it.
But first – let’s add the Http module to the Private Dependency Modules in the plugin Build.cs
PrivateDependencyModuleNames.AddRange(new string[]{ "CoreUObject", "Engine", "Http" });#include "Kismet/BlueprintAsyncActionBase.h"
#include "Http.h"
// Declaration of the "Dynamic Multicast Delegate Type". It accepts the Http Status Code as a parameter.
DECLARE_DYNAMIC_MULTICAST_DELEGATE_OneParam(FOnFinishedRequestHttp, int32, StatusCode);
UCLASS()
class XPLUGIN_API UXPluginHttpRequestProxy : public UBlueprintAsyncActionBase
{
GENERATED_BODY()
public:
// This is Blueprint Assignable Delegate which will run when the Async Task will finish with success.
UPROPERTY(BlueprintAssignable)
FOnFinishedRequestHttp OnSuccess;
// This is Blueprint Assignable Delegate which will run when the Async Task will finish with failure.
UPROPERTY(BlueprintAssignable)
FOnFinishedRequestHttp OnFailure;
// This is the Async Blueprint Function for calling the request. It receives automatically the World Context from the Engine when it is called.
UFUNCTION(BlueprintCallable, Category = "XPlugin", meta = (BlueprintInternalUseOnly = "true", WorldContext = "WorldContextObject", DisplayName = "XPlugin Request For Cats"))
static UXPluginHttpRequestProxy* XPluginRequestForCats(UObject* WorldContextObject);
// The UBlueprintAsyncActionBase function to override - runs when the request becomes Active.
virtual void Activate() override;
private:
// The function which will run when the Http request finishes.
void OnHttpRequestComplete(FHttpRequestPtr HttpRequest, FHttpResponsePtr HttpResponse, bool bSucceeded);
// The pointer to the WorldContext. We simply need it.
UObject* WorldContextObject;
};// The call function actually creates the Proxy - an object of it's own type - and returns it to the Blueprint Context.
UXPluginHttpRequestProxy* UXPluginHttpRequestProxy::XPluginRequestForCats(UObject* WorldContextObject)
{
UXPluginHttpRequestProxy* Proxy = NewObject<UXPluginHttpRequestProxy>();
Proxy->WorldContextObject = WorldContextObject;
return Proxy;
}
// The Proxy is Activeted shortly after it's creation. We can launch the Http request here.
void UXPluginHttpRequestProxy::Activate()
{
TSharedRef<class IHttpRequest> HttpRequest = FHttpModule::Get().CreateRequest();
HttpRequest->OnProcessRequestComplete().BindUObject(this, &UXPluginHttpRequestProxy::OnHttpRequestComplete);
HttpRequest->SetURL(TEXT("http://thecatapi.com/api/images/get?format=src&type=png"));
HttpRequest->SetVerb(TEXT("GET"));
HttpRequest->ProcessRequest();
}
// Here we've received the Http response. We can launch the OnSuccess and OnFailure delegate dependently on if the request finished with success.
void UXPluginHttpRequestProxy::OnHttpRequestComplete(FHttpRequestPtr HttpRequest, FHttpResponsePtr HttpResponse, bool bSucceeded)
{
if (bSucceeded == true)
{
OnSuccess.Broadcast(HttpResponse->GetResponseCode());
}
else
{
OnFailure.Broadcast(HttpResponse->GetResponseCode());
}
}
Summary
This is it! This is how you can write a multiplatform Unreal Engine 4 plugin with the C++ and the Blueprint support! These are only basics, of course. With plugins you can implement third party libraries, add buttons or even whole windows and editors to the Editor. But this might be a material for a whole new article. I hope this one will help You somehow. The plugin we’ve just created is available on GitHub.Now – go and make some!